
**CT Tag & Tut 4 FwTags Creations**
I am Using The Absolutely Beautiful Kit Called A Unicorns Realm by FwTags Creations http://
76 Elements,3 Poser fairy's,7 Frames and 9 Papers.
With 3 unicorns in different poses and 3 fairy posers this is a magical natural kit,
you can find the kit here http://berryapplicious.com/
and now;
http://www.rockinscrapz.com/
You Can find more info about this tag and the tut on my blog http://kaztags.blogspot.co.uk/

This tutorial is of my own creation and any resemblance to any other tuts is purely coincidental. This tutorial is for personal use only.you will need a working knowledge of gimp or psp or other similar programmes.I am using gimp
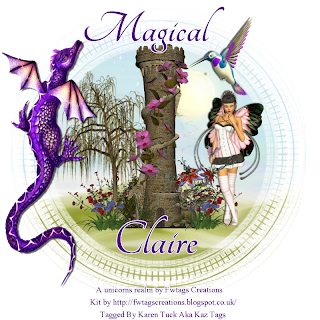
I am Using The Absolutely Beautiful Kit Called A Unicorns Realm by FwTags Creations http://fwtagscreations.blogspot.co.uk/ this magical kit contains
76 Elements,3 Poser fairy's,7 Frames and 9 Papers.
With 3 unicorns in different poses and 3 fairy posers this is a magical natural kit,
you can find the kit here http://berryapplicious.com/store/index.php?main_page=index&manufacturers_id=76
and now;
http://www.rockinscrapz.com/shop/index.php?main_page=index&manufacturers_id=106
I am also using wsl mask 123 which you can get here at her blog http://weescotslasscreations.blogspot.co.uk/
Ok Now Lets Begin
*..Open up a new layer 600 x600
*..open up paper 4 and scale it to fit the canvas
*.. open and add your layer mask .If Your Unsure how to add the mask here you go open up your mask layer scale too 600x600
And make sure it is above the paper layer in your layers box
next right click the paper layer in the layer box and click add layer mask make sure full black transparency is selected in the pop up box make sure the little black box is highlighted white on your dialogue box .
now click on your mask layer in the layer box and go up to edit then click copy .you can hide the mask layer now by clicking the little eye.
next click on your paper layer go up to edit and hit paste you should now see your mask paper layer you will need to anchor the floating layer you do this by hitting the little icon that looks like an anchor on your layer box.you can now delete the original mask layer .
ok so we can move on .
*..next open up element 9 and scale to around 230x470 and place in the middle of your paper mask layer.
*..now add a drop shadow of 2,2,3, black
*..next open up element 65 scale to 290 x330 and place to the left of the tower .
*..next open up element 33 scale 200x135 then duplicate layer place either side of tower at the bottom
*.. next open up element 21 scale to 150x80 duplicate layer and place on left hand side at bottom of tree in front of the red flowers .
*..open element 74 scale element 200 x135 place righ hand side of tower .
*.. open element 14 and rotate it a little and scale it down so it looks like its climbing the tower wall .
*..open up poser and scale 175x340 place on the right hand side of tower and add a drop shadow of 2,2,2 black
*..now we are going to use element 7 scale to 240 x620 and place on the outer left hand edge of paper layer and repeat your drop shadow .
*..open element 4 scale 160x195 and place at the top right hand side above poser and add a drop shadow .
*.. merge all layers
*.. add credits to the bottom of your canvas
*.. Now Add your text/ name in your chosen font
and your done
Thankyou for using my tutorial
 Heres a few tag extras


No comments:
Post a Comment